![]()


Community | Installation | Features | Development | Acknowledgements | License
Terasology Launcher is the official launcher for the open source game Terasology. It provides easy access to the different game versions and build types. Terasology and related projects are developed by a group of software enthusiast volunteers under the organization name MovingBlocks.
Community
If you want to get in contact with the Terasology community and the whole MovingBlocks team, you can easily connect with us, share your ideas, report and solve problems. We are present in nearly the complete round-up of social networks. Follow/friend us wherever you want, chat with us and tell the world.


Installation
- Download the corresponding archive for your platform from the latest release
- Extract the archive to the path where the launcher should be installed
- Start Terasology Launcher
| Operating System | Executable |
|---|---|
| Windows | TerasologyLauncher.exe or bin/TerasologyLauncher.bat |
| Unix, Linux, Mac OS X | bin/TerasologyLauncher |
Features
The launcher installation directory is the folder you extracted the launcher archive into. This directory will also hold different versions of Terasology that are installed via the launcher.
On first start-up, the Terasology Launcher will prompt you with the selection of the Terasology data directory. The data directory is the place for configuration data and user-specific files such as key bindings and save games. The suggested default is a new directory in the user's home directory.
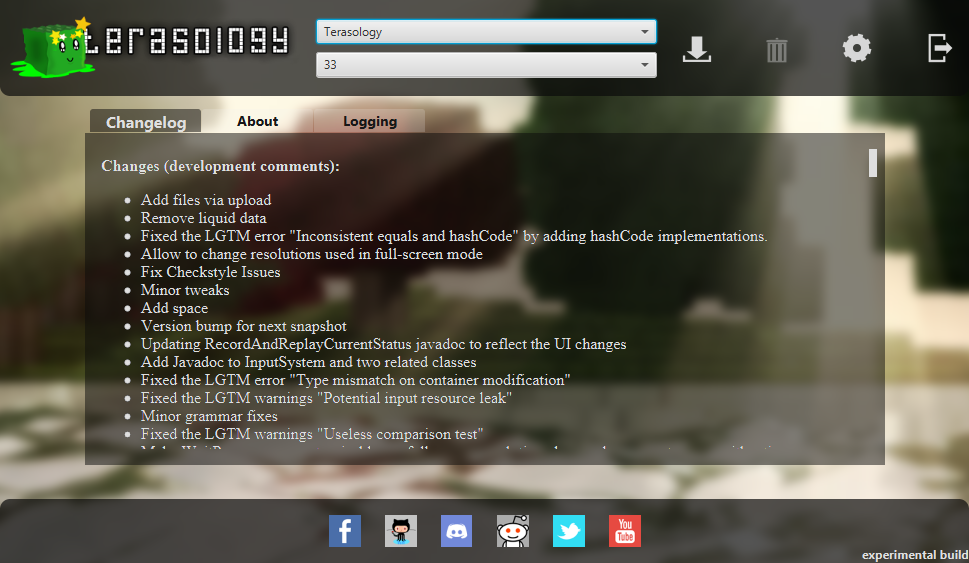
The Terasology Launcher UI provides functionality to download, start, and delete different game versions. The game versions are grouped by the type of build they belong to:
| Build Type | Explanation |
|---|---|
| Terasology | Released version of Terasology core game bundled with modules |
| Terasology Lite | Released version of Terasology core game only |
In addition to this main functionality, the UI displays information about new changes of the selected game version ("Changelog"), launcher information concerning changes, licensing and contribution guidelines ("About"), and logging data for the current launcher execution. Further, you have access to the social media representation of Terasology.
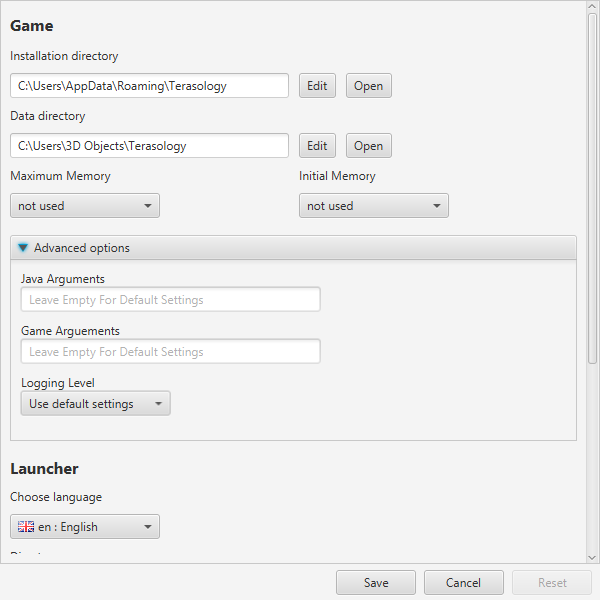
The settings view enables you to open the launcher installation, game installation and data directories for quick access. You can configure the memory settings for the game and even specify additional Java or game arguments as well as the logging level for the game. Please note, that the "Initial Game Memory" and "Maximum Game Memory" settings only apply to the game itself. The actual resource consumption may be higher due to additional resources required by the Java Virtual Machine (JVM).
The remaining settings can be used to configure the launcher. You can set the launcher language and decide whether the launcher should search for updates, close when a game is started and save downloaded game package files.
Development
To be able to run TerasologyLauncher from source follow these steps. This guide is designed for IntelliJ IDEA (you can use the free community edition), but alternative setups are possible.
:octocat: Get Ready
To contribute to this repo, please open a pull request from your fork of this repository.
For more information on building and developing the Terasology Launcher, make sure to read the rest of this README and CONTRIBUTING.md.
Requirements
You'll need the following tools:
- Java SE Development Kit (JDK) 11. It should be possible to use a later version of the JDK for local development, please see the definition of push validation for the exact CI setup.
- Git to clone the repo and commit changes.
Development is possible on all common platforms (Windows, Linux, MacOS).
🤓 Start developing
Familiarise yourself with Git's concept of repositories, branches, and commits. To get the latest changes from remote repositories you need to fetch all remote data via git fetch --all. This does not change your workspace, it just loads up your local Git database.
Apart from Git, basically everything can be done using the Gradle wrapper. The following list is an excerpt of some commonly used tasks.
| Command | Description |
|---|---|
gradlew build |
Compile the source code, run tests and build a JAR. |
gradlew install |
Create a local runnable installation (placed in ./build/install/TerasologyLauncher). |
gradlew run |
Build and run the launcher. |
gradlew createRelease |
Create a local development release (located in ./build/distributions). |
gradlew tasks |
Display other available build script tasks. |
Assume you have pushed some changes to your fork into a branch myFeature.
In order to let us know about your work and give us the possibility to incorporate your changes you should send us a pull request.
You can do this by selecting the myFeature branch on your GitHub repo and click the button which says "Open pull request".
More information on how to contribute can be found in CONTRIBUTING.md. Remember, that all submissions must be licensed under Apache License, Version 2.0.
📚 Related Resources
Tutorials and further information on Git:
Developer setup tutorials for our main project, Terasology:
Acknowledgements
Terasology Launcher is driven by its contributors!
This project uses
- Font Awesome Icon for Webchat (
fa-comments), CC BY 4.0 License, Font Awesome Free License - Mark James' Flag Icons Pack
- Bellsoft Liberica JDK 11 is bundled with the launcher
License
Terasology Launcher is licensed under the Apache License, Version 2.0.