|
|
||
|---|---|---|
| models | ||
| screenshots | ||
| textures | ||
| .gitattributes | ||
| LICENSE | ||
| README.md | ||
| default.nodecolors.conf | ||
| default.nodevariants.lua | ||
| init.lua | ||
| mod.conf | ||
README.md
Woolen Meshes (wesh)
An in-game mesh creator for Minetest
Developed and tested on Minetest 0.4.16 - try in other versions at your own risk :)
If you like my contributions you may consider reading http://entuland.com/en/support-entuland
WIP MOD forum thread: https://forum.minetest.net/viewtopic.php?f=9&t=20115
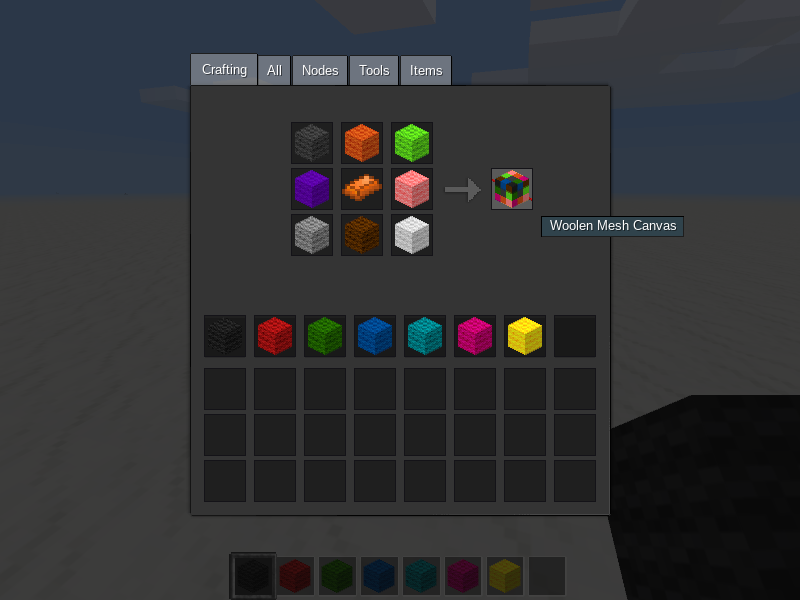
Canvas recipes
W = any wool block
I = inner ingredient (see list below)

WWW
WIW
WWW

wesh:canvas02 (steel ingot)
wesh:canvas04 (copper ingot)
wesh:canvas08 (tin ingot)
wesh:canvas16 (bronze ingot) - wesh:canvas gives you wesh:canvas16, kept for compatibility
wesh:canvas32 (gold ingot)
wesh:canvas64 (diamond) read *careful* notice after the screenshot
CAREFUL the largest canvas size may hang your game and crash it! Even if it doesn't crash it will most likely produce a mesh that the game isn't able to deal with!
You'll most likely end up with a dull gray miniature in the inventory and with a completely transparent node when placed in the world.
This has been added to the mod just to let everybody (in particular the devs, if they're interested to) investigate on the thing.
How to use
Place down a Canvas block, you'll see that it extends beyond its node space marking a cube (available in sizes 2, 4, 8, 16 and 32)
The following screenshots show the old texture of the canvas (the one and only 16x16x16) now replaced by a new texture marked 16 just like the ones you can here below:

So here is the example using the canvas with size 16 marking its capture space:

In this space you can build anything you like by using colored wool blocks or most of the built-in blocks shipped with minetest_game:

Once you're done with your build, go to the Canvas block and right click it: you'll be asked to provide a name for your mesh (you can type any text in there, with uppercases and any symbol):

When you confirm such name (you can cancel it by hitting the ESC key) you'll likely get a confirmation like this:
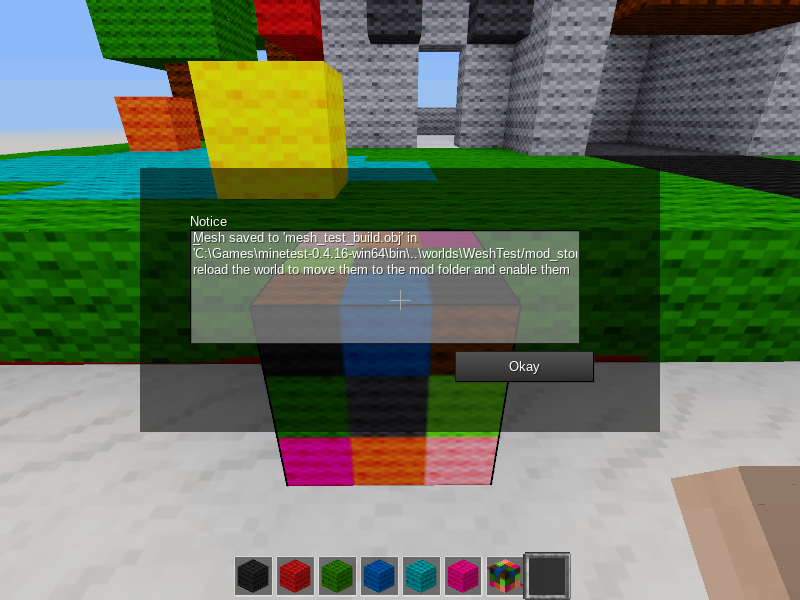
If you confirm the name by hitting ENTER you may not be presented with the above confirmation. It will appear in the chat as well just in case.
Upon saving a few temporary files will be created in the /mod_storage/wesh subfolder in your world's folder:
- the
.objfile will contain a model with your build scaled down to fit exactly one block - the
.obj.datfile will contain the original name you have chosen for your mesh, along with some other data (read the section about using custom textures below) - the
.obj.matrix.datfile will contain a serialized version of your build, that may eventually get used to rebuild / reimport it in the game allowing you to alter it (right now you can't import them, so make sure you don't dismantle your build if you want to alter and capture it again)
The above files are saved there only temporarily because mods don't have writing permission in their own folder while the world is running. In order to use your new meshes in the game you need to restart the world.
During world startup the mod will move all the temporary files to the /models folder and will load them.
You can't have two meshes with the same name (during the saving process the mod checks both the temporary meshes that haven't been loaded yet and those that have been already moved to the mod's folder).
If you want to delete a mesh you need to delete its files from either the world's folder (if you haven't restarted it since you captured the mesh you want to delete) or from the mod's folder (if such mesh has been already moved by a world reload).
By default, four versions of each mesh will be available:
-
plain versions: they use flat colors averaged from the colors of each wool block, with a bordered variant


-
wool versions: they will use the actual textures used by the wool blocks, with a bordered variant


Sample of natural terrain capture:

Collision boxes will be built automatically depending on the extent of your mesh:

Up to 8 collision boxes will be created according to the mesh geometry allowing you to create stairs, slabs, frames, carpets and so forth, collision boxes will be merged into larger ones when fitting.
Such new blocks can't be crafted (I plan to make sort of a crafting station where you put some material and chose the model you want to craft), so you either need to give them to yourself or to find them in the Creative inventory. All such meshes show up if you filter for either wesh or mesh.

Looking at the filename (or knowing how the name gets converted) you can also work out the actual nodename to be used in your /give or /giveme chat command, for example:
- chosen name:
Test One! - resulting filename:
mesh_test_one.obj - resulting nodename:
wesh:mesh_test_one_VERSIONwhereVERSIONwill actually be something likewoolorplainborderor whatever other variant has been enabled (see the following section for details about this)
Specifying custom properties
In the .obj.dat file of each mesh you'll find something like this:
return {
    description = "Your mesh name",
    variants = {
        plain = "plain-16.png",
        plainborder = "plain-border-72.png",
        wool = "wool-72.png",
        woolborder = "wool-border-72.png",
    },
}
(please consider that the number 16 here above indicates the size of the texture, it has nothing to do with the size of the canvas you use to capture your build)
Default variants are stored in the file default.nodevariants.lua which gets copied over to nodevariants.lua when starting up the mod if no such file exists.
In order to add a new variant simply add a line with your texture name and make sure you save such texture file in the /textures folder of the mod. You can also remove the lines you're not interested in and the mod will not generate those variants. You can do this operation either on the nodevariants.lua file (it will affect all new captures) or in the .obj.dat file associated to each mesh (will affect only that mesh).
For example, here we remove all but the plain version and add a custom one:
return {
    description = "Your mesh name",
    variants = {
        plain = "plain-16.png",
        my_texture_plain_name = "my-texture-file-name.png",
    },
}
Have a look at wool-72.png to see where each color goes, or use the included textures-72.xcf file (GIMP format) which has layers for adding the borders as well.
You can as well override any property you would normally pass to node_register(), such as walkable, groups, collision_box, selection_box and so forth. The only property that doesn't get really overridden but just mangled according to the variants is the description one. You shouldn't even be overriding tiles cause they will be built according to the variants property (property which is specific to this mod's .obj.dat files).
A couple considerations:
- the bottom-right transparent area never gets used
- the used texture for each face will actually be a bit smaller (in the
wool-72.pngfile the squares are 18 pixels in side, but the texture will only use a 16x16 square inside of it) - you're not forced to use any particular size for your texture as long as it's square (I guess, let me know if you find any problems)
Changing default colors assigned to nodes
The file default.nodecolors.conf contains the modname:nodename = color associations for all the nodes that get loaded in a minetest_game world. This file will be copied over to nodecolors.conf at startup (if no such file exists); in nodecolors.conf you're free to alter existing colors and to add new nodes, just make sure you stick to wool colors cause any invalid color will be replaced by air. Do not store your changes into default.nodecolors.conf cause it will be overwritten updating the mod (and it wouldn't get used anyway if a nodecolors.conf file is there at all).