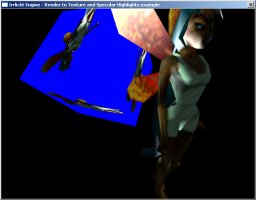
This tutorial shows how to render to a texture using Irrlicht. Render to texture is a feature where everything which would usually be rendered to the screen is instead written to a (special) texture. This can be used to create nice special effects. In addition, this tutorial shows how to enable specular highlights.
In the beginning, everything as usual. Include the needed headers, ask the user for the rendering driver, create the Irrlicht device:
#include <irrlicht.h>
#include "driverChoice.h"
#include "exampleHelper.h"
using namespace irr;
#ifdef _MSC_VER
#pragma comment(lib, "Irrlicht.lib")
#endif
int main()
{
video::E_DRIVER_TYPE driverType=driverChoiceConsole();
if (driverType==video::EDT_COUNT)
return 1;
IrrlichtDevice *device =
createDevice(driverType, core::dimension2d<u32>(640, 480),
16, false, false);
if (device == 0)
return 1;
video::IVideoDriver* driver = device->getVideoDriver();
scene::ISceneManager* smgr = device->getSceneManager();
gui::IGUIEnvironment* env = device->getGUIEnvironment();
const io::path mediaPath = getExampleMediaPath();
Now, we load an animated mesh to be displayed. As in most examples, we'll take the fairy md2 model. The difference here: We set the shininess of the model to a value other than 0 which is the default value. This enables specular highlights on the model if dynamic lighting is on. The value influences the size of the highlights.
scene::IAnimatedMeshSceneNode* fairy = smgr->addAnimatedMeshSceneNode(
smgr->getMesh(mediaPath + "faerie.md2"));
if (fairy)
{
fairy->setMaterialTexture(0,
driver->getTexture(mediaPath + "faerie2.bmp"));
fairy->setMaterialFlag(video::EMF_LIGHTING, true);
fairy->getMaterial(0).Shininess = 20.0f;
fairy->setPosition(core::vector3df(-10,0,-100));
fairy->setMD2Animation ( scene::EMAT_STAND );
}
To make specular highlights appear on the model, we need a dynamic light in the scene. We add one directly in vicinity of the model. In addition, to make the model not that dark, we set the ambient light to gray.
smgr->addLightSceneNode(0, core::vector3df(-15,5,-105),
video::SColorf(1.0f, 1.0f, 1.0f));
smgr->setAmbientLight(video::SColor(0,60,60,60));
The next is just some standard stuff: Add a test cube and let it rotate to make the scene more interesting. The user defined camera and cursor setup is made later on, right before the render loop.
scene::ISceneNode* cube = smgr->addCubeSceneNode(60);
scene::ISceneNodeAnimator* anim = smgr->createRotationAnimator(
core::vector3df(0.3f, 0.3f,0));
cube->setPosition(core::vector3df(-100,0,-100));
cube->setMaterialFlag(video::EMF_LIGHTING, false);
cube->addAnimator(anim);
anim->drop();
device->setWindowCaption(L"Irrlicht Engine - Render to Texture and Specular Highlights example");
To test out the render to texture feature, we need to define our new rendertarget. The rendertarget will need one texture to receive the result you would otherwise see on screen and one texture which is used as depth-buffer.
(Note: If you worked with older Irrlicht versions (before 1.9) you might be used to only create a rendertarget texture and no explicit rendertarget. While that's still possible, it's no longer recommended.)
The rendertarget textures are not like standard textures, but need to be created first. To create them, we call IVideoDriver::addRenderTargetTexture() and specify the size of the texture and the type. For depth-maps you can use types ECF_D16, ECF_D32 or ECF_D24S8. When ECF_D24S8 you can also use a stencil-buffer.
Because we want to render the scene not from the user camera into the texture, we add another fixed camera to the scene. But before we do all this, we check if the current running driver is able to render to textures. If it is not, we simply display a warning text.
video::IRenderTarget* renderTarget = 0;
scene::ICameraSceneNode* fixedCam = 0;
if (driver->queryFeature(video::EVDF_RENDER_TO_TARGET))
{
const core::dimension2d<u32> rtDim(256, 256);
video::ITexture* renderTargetTex = driver->addRenderTargetTexture(rtDim, "RTT1", video::ECF_A8R8G8B8);
video::ITexture* renderTargetDepth = driver->addRenderTargetTexture(rtDim, "DepthStencil", video::ECF_D16);
renderTarget = driver->addRenderTarget();
renderTarget->setTexture(renderTargetTex, renderTargetDepth);
cube->setMaterialTexture(0, renderTargetTex);
fixedCam = smgr->addCameraSceneNode(0, core::vector3df(10,10,-80),
core::vector3df(-10,10,-100));
}
else
{
gui::IGUISkin* skin = env->getSkin();
gui::IGUIFont* font = env->getFont(mediaPath + "fonthaettenschweiler.bmp");
if (font)
skin->setFont(font);
gui::IGUIStaticText* text = env->addStaticText(
L"Your hardware or this renderer is not able to use the "\
L"render to texture feature. RTT Disabled.",
core::rect<s32>(150,20,470,60));
text->setOverrideColor(video::SColor(100,255,255,255));
}
scene::ICameraSceneNode* fpsCamera = smgr->addCameraSceneNodeFPS();
fpsCamera->setPosition(core::vector3df(-50,50,-150));
device->getCursorControl()->setVisible(false);
Nearly finished. Now we need to draw everything. Every frame, we draw the scene twice. Once from the fixed camera into the render target texture and once as usual. When rendering into the render target, we need to disable the visibility of the test cube, because it has the render target texture applied to it. That's it, wasn't too complicated I hope. :)
int lastFPS = -1;
while(device->run())
if (device->isWindowActive())
{
driver->beginScene(video::ECBF_COLOR | video::ECBF_DEPTH, video::SColor(0));
if (renderTarget)
{
driver->setRenderTargetEx(renderTarget, video::ECBF_COLOR | video::ECBF_DEPTH, video::SColor(0,0,0,255));
cube->setVisible(false);
smgr->setActiveCamera(fixedCam);
smgr->drawAll();
driver->setRenderTargetEx(0, 0);
cube->setVisible(true);
smgr->setActiveCamera(fpsCamera);
}
smgr->drawAll();
env->drawAll();
driver->endScene();
int fps = driver->getFPS();
if (lastFPS != fps)
{
core::stringw str = L"Irrlicht Engine - Render to Texture and Specular Highlights example";
str += " FPS:";
str += fps;
device->setWindowCaption(str.c_str());
lastFPS = fps;
}
}
device->drop();
return 0;
}