Tutorial 8: SpecialFX
008shot.jpg

This tutorial describes how to do special effects. It shows how to use stencil buffer shadows, the particle system, billboards, dynamic light, and the water surface scene node.

We start like in some tutorials before. Please note that this time, the 'shadows' flag in createDevice() is set to true, for we want to have a dynamic shadow cast from an animated character. If this example runs too slow, set it to false. The Irrlicht Engine also checks if your hardware doesn't support the stencil buffer, and then disables shadows by itself.

#include <irrlicht.h>
#include <iostream>
#include "driverChoice.h"
#include "exampleHelper.h"
using namespace irr;
#ifdef _MSC_VER
#pragma comment(lib, "Irrlicht.lib")
#endif
int main()
{
// ask if user would like shadows
char i = 'y';
printf("Please press 'y' if you want to use realtime shadows.\n");
std::cin >> i;
const bool shadows = (i == 'y');
// ask user for driver
video::E_DRIVER_TYPE driverType=driverChoiceConsole();
if (driverType==video::EDT_COUNT)
return 1;

Create device and exit if creation failed. We make the stencil flag optional to avoid slow screen modes for runs without shadows.

IrrlichtDevice *device =
createDevice(driverType, core::dimension2d<u32>(640, 480),
16, false, shadows);
if (device == 0)
return 1; // could not create selected driver.
video::IVideoDriver* driver = device->getVideoDriver();
scene::ISceneManager* smgr = device->getSceneManager();
const io::path mediaPath = getExampleMediaPath();

For our environment, we load a .3ds file. It is a small room I modeled with Anim8or and exported into the 3ds format because the Irrlicht Engine does not support the .an8 format. I am a very bad 3d graphic artist, and so the texture mapping is not very nice in this model. Luckily I am a better programmer than artist, and so the Irrlicht Engine is able to create a cool texture mapping for me: Just use the mesh manipulator and create a planar texture mapping for the mesh. If you want to see the mapping I made with Anim8or, uncomment this line. I also did not figure out how to set the material right in Anim8or, it has a specular light color which I don't really like. I'll switch it off too with this code.

scene::IAnimatedMesh* mesh = smgr->getMesh(mediaPath + "room.3ds");
smgr->getMeshManipulator()->makePlanarTextureMapping(mesh->getMesh(0), 0.004f);
scene::ISceneNode* node = 0;
node = smgr->addAnimatedMeshSceneNode(mesh);
node->setMaterialTexture(0, driver->getTexture(mediaPath + "wall.jpg"));
node->getMaterial(0).SpecularColor.set(0,0,0,0);

Now, for the first special effect: Animated water. It works like this: The WaterSurfaceSceneNode takes a mesh as input and makes it wave like a water surface. And if we let this scene node use a nice material like the EMT_REFLECTION_2_LAYER, it looks really cool. We are doing this with the next few lines of code. As input mesh, we create a hill plane mesh, without hills. But any other mesh could be used for this, you could even use the room.3ds (which would look really strange) if you want to.

mesh = smgr->addHillPlaneMesh( "myHill",
core::dimension2d<f32>(20,20),
core::dimension2d<u32>(40,40), 0, 0,
core::dimension2d<f32>(0,0),
core::dimension2d<f32>(10,10));
node = smgr->addWaterSurfaceSceneNode(mesh->getMesh(0), 3.0f, 300.0f, 30.0f);
node->setPosition(core::vector3df(0,7,0));
node->setMaterialTexture(0, driver->getTexture(mediaPath + "stones.jpg"));
node->setMaterialTexture(1, driver->getTexture(mediaPath + "water.jpg"));
node->setMaterialType(video::EMT_REFLECTION_2_LAYER);

The second special effect is very basic, I bet you saw it already in some Irrlicht Engine demos: A transparent billboard combined with a dynamic light. We simply create a light scene node, let it fly around, and to make it look more cool, we attach a billboard scene node to it.

// create light
scene::ILightSceneNode * lightNode = smgr->addLightSceneNode(0, core::vector3df(0,0,0),
video::SColorf(1.0f, 0.6f, 0.7f, 1.0f), 800.0f);
scene::ISceneNodeAnimator* anim = 0;
anim = smgr->createFlyCircleAnimator (core::vector3df(0,150,0),250.0f, 0.0005f);
lightNode ->addAnimator(anim);
anim->drop();
// attach billboard to light
node = smgr->addBillboardSceneNode(lightNode, core::dimension2d<f32>(50, 50));
node->setMaterialFlag(video::EMF_LIGHTING, false);
node->setMaterialType(video::EMT_TRANSPARENT_ADD_COLOR);
node->setMaterialTexture(0, driver->getTexture(mediaPath + "particlewhite.bmp"));

The next special effect is a lot more interesting: A particle system. The particle system in the Irrlicht Engine is quite modular and extensible, but yet easy to use. There is a particle system scene node into which you can put a particle emitter, which makes particles come out of nothing. These emitters are quite flexible and usually have lots of parameters like direction, amount, and color of the particles they create.

There are different emitters, for example a point emitter which lets particles pop out at a fixed point. If the particle emitters available in the engine are not enough for you, you can easily create your own ones, you'll simply have to create a class derived from the IParticleEmitter interface and attach it to the particle system using setEmitter(). In this example we create a box particle emitter, which creates particles randomly inside a box. The parameters define the box, direction of the particles, minimal and maximal new particles per second, color, and minimal and maximal lifetime of the particles.

Because only with emitters particle system would be a little bit boring, there are particle affectors which modify particles while they fly around. Affectors can be added to a particle system for simulating additional effects like gravity or wind. The particle affector we use in this example is an affector which modifies the color of the particles: It lets them fade out. Like the particle emitters, additional particle affectors can also be implemented by you, simply derive a class from IParticleAffector and add it with addAffector().

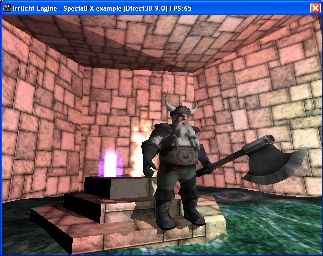
After we set a nice material to the particle system, we have a cool looking camp fire. By adjusting material, texture, particle emitter, and affector parameters, it is also easily possible to create smoke, rain, explosions, snow, and so on.

// create a particle system
scene::IParticleSystemSceneNode* ps =
smgr->addParticleSystemSceneNode(false);
if (ps)
{
scene::IParticleEmitter* em = ps->createBoxEmitter(
core::aabbox3d<f32>(-7,0,-7,7,1,7), // emitter size
core::vector3df(0.0f,0.06f,0.0f), // initial direction
80,100, // emit rate
video::SColor(0,255,255,255), // darkest color
video::SColor(0,255,255,255), // brightest color
800,2000,0, // min and max age, angle
core::dimension2df(10.f,10.f), // min size
core::dimension2df(20.f,20.f)); // max size
ps->setEmitter(em); // this grabs the emitter
em->drop(); // so we can drop it here without deleting it
scene::IParticleAffector* paf = ps->createFadeOutParticleAffector();
ps->addAffector(paf); // same goes for the affector
paf->drop();
ps->setPosition(core::vector3df(-70,60,40));
ps->setScale(core::vector3df(2,2,2));
ps->setMaterialFlag(video::EMF_LIGHTING, false);
ps->setMaterialFlag(video::EMF_ZWRITE_ENABLE, false);
ps->setMaterialTexture(0, driver->getTexture(mediaPath + "fire.bmp"));
ps->setMaterialType(video::EMT_TRANSPARENT_ADD_COLOR);
}

Next we add a volumetric light node, which adds a glowing fake area light to the scene. Like with the billboards and particle systems we also assign a texture for the desired effect, though this time we'll use a texture animator to create the illusion of a magical glowing area effect.

scene::IVolumeLightSceneNode * n = smgr->addVolumeLightSceneNode(0, -1,
32, // Subdivisions on U axis
32, // Subdivisions on V axis
video::SColor(0, 255, 255, 255), // foot color
video::SColor(0, 0, 0, 0)); // tail color
if (n)
{
n->setScale(core::vector3df(56.0f, 56.0f, 56.0f));
n->setPosition(core::vector3df(-120,50,40));
// load textures for animation
core::array<video::ITexture*> textures;
for (s32 g=7; g > 0; --g)
{
core::stringc tmp(mediaPath);
tmp += "portal";
tmp += g;
tmp += ".bmp";
video::ITexture* t = driver->getTexture( tmp.c_str() );
textures.push_back(t);
}
// create texture animator
scene::ISceneNodeAnimator* glow = smgr->createTextureAnimator(textures, 150);
// add the animator
n->addAnimator(glow);
// drop the animator because it was created with a create() function
glow->drop();
}

As our last special effect, we want a dynamic shadow be cast from an animated character. For this we load a DirectX .x model and place it into our world. For creating the shadow, we simply need to call addShadowVolumeSceneNode(). The color of shadows is only adjustable globally for all shadows, by calling ISceneManager::setShadowColor(). Voila, here is our dynamic shadow.

Because the character is a little bit too small for this scene, we make it bigger using setScale(). And because the character is lighted by a dynamic light, we need to normalize the normals to make the lighting on it correct. This is always necessary if the scale of a dynamic lighted model is not (1,1,1). Otherwise it would get too dark or too bright because the normals will be scaled too.

// add animated character
mesh = smgr->getMesh(mediaPath + "dwarf.x");
scene::IAnimatedMeshSceneNode* anode = 0;
anode = smgr->addAnimatedMeshSceneNode(mesh);
anode->setPosition(core::vector3df(-50,20,-60));
anode->setAnimationSpeed(15);

Shadows still have to be drawn even then the node causing them is not visible itself. We have to disable culling if the node is animated or it's transformations change as otherwise the shadow is not updated correctly. If you have many objects and this becomes a speed problem you will have to figure out some manual culling (for exampling hiding all objects beyond a certain distance).

anode->setAutomaticCulling(scene::EAC_OFF);
// add shadow
anode->addShadowVolumeSceneNode();
smgr->setShadowColor(video::SColor(150,0,0,0));
// make the model a bit bigger
anode->setScale(core::vector3df(2,2,2));
// because of the scaling we have to normalize its normals for correct lighting
anode->setMaterialFlag(video::EMF_NORMALIZE_NORMALS, true);
// let the dwarf slowly rotate around it's y axis
scene::ISceneNodeAnimator* ra = smgr->createRotationAnimator(irr::core::vector3df(0, 0.1f, 0));
anode->addAnimator(ra);
ra->drop();

Finally we simply have to draw everything, that's all.

scene::ICameraSceneNode* camera = smgr->addCameraSceneNodeFPS();
camera->setPosition(core::vector3df(-50,50,-150));
camera->setFarValue(10000.0f); // this increase a shadow visible range.
// disable mouse cursor
device->getCursorControl()->setVisible(false);
s32 lastFPS = -1;
while(device->run())
if (device->isWindowActive())
{
driver->beginScene(video::ECBF_COLOR | video::ECBF_DEPTH, video::SColor(0));
smgr->drawAll();
driver->endScene();
const s32 fps = driver->getFPS();
if (lastFPS != fps)
{
core::stringw str = L"Irrlicht Engine - SpecialFX example [";
str += driver->getName();
str += "] FPS:";
str += fps;
device->setWindowCaption(str.c_str());
lastFPS = fps;
}
}
device->drop();
return 0;
}